VRoid to VRChat: Clothing Swaps Guide
How I switch clothing meshes on my VRC avatar.
Ever since I had gotten my Meta Quest 2, I have started to dabble with VRChat quite mildly, and more importantly - working on my own avatar during any downtime I have. And unfortunately, direct drop-in clothing for VRC avatars mostly come for custom avatars that are usually paid and I don’t really like them - either too tacky, too cliche, or they stand out too much, and clothing assets available on sites like Booth are usually for use in VRoid Studio. So, how can we have our cake and eat it too, if we’re using VRoid models for VRChat?
In this guide, I’ll show you how.
I should probably preface this by absolving myself of credit where it’s due in terms of knowledge - I have watched multiple YouTube tutorials on manipulating both VRoid and VRChat avatars as well as a bunch of tutorials on porting these avatars. Most of my knowledge for this tutorial comes from the following videos:
- Lady Aska covering how to add clothing toggles for Vroid VRMs - YouTube Link;
- Virtual Panda’s video series on porting Vroid avatars to VRC - YouTube playlist Link.
Also, this guide assumes you have already dabbled in creating and optimizing both VRoid and VRChat avatars alike(if not, go back and watch more videos!).
With that out of the way - let’s get into it!
Step 1: VRoid Studio Wardrobe Purgatory
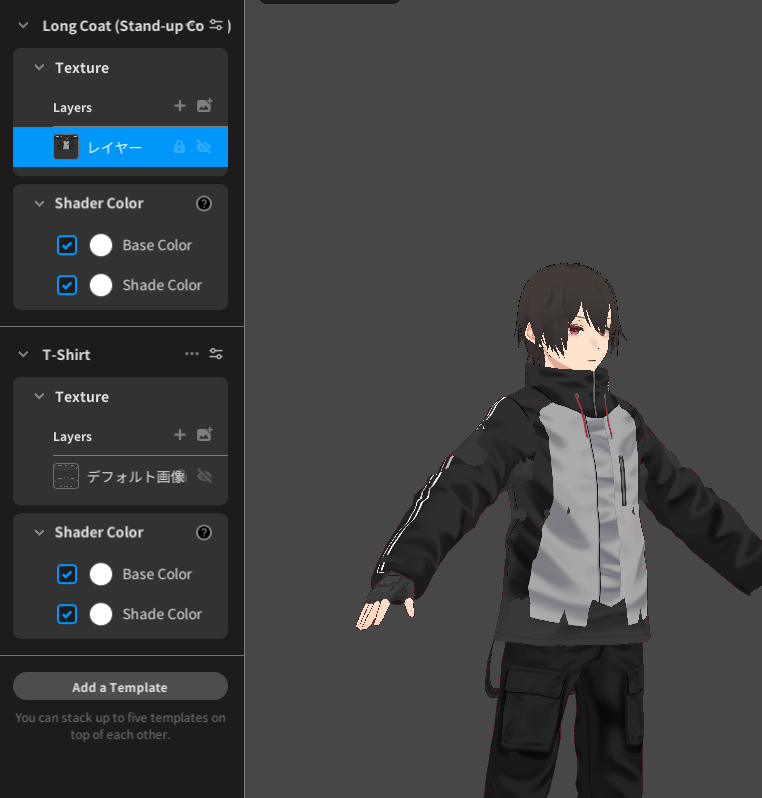
First and foremost, you’ll want your avatar with all the clothing. You’ll want to edit the texture of the first piece of clothing you want to edit, then add templates of clothes you wish to add(e.g. on your existing hoodie you wish to add a rain coat) - and as long as they are separate meshes it’ll work! The example avatars provided with VRoid Studio already exercise this - you just need to make sure all of the clothing articles are visible(don’t panic if they’re clipping right now and look ugly - we’ll deal with that later!) See the picture below for details:

Here you can see two pieces of clothing on an avatar and them overlapping as both meshes are visible.
Another limitation I need to mention is that you can only have up to 5 clothes per spot, so you cannot go totally ham on a VRM file; however it doesn’t stop you from adding more swaps later, so you can later come back and add more clothing options!
Once you have everything set up, go ahead and export your avatar as a VRM, but please remember to uncheck the checkmarks of Delete Transparent Meshes, found in the Reduce Polygons drop-down, and Combine Hair Mesh, found in Reduce Materials drop-down - otherwise your avatar will be unworkable. See picture below for visual aid.

This picture highlights two options you need to uncheck.
After this, it’s time for:
Step 2: Blender + CATS madness
Now, you’ll want to get your hands on Blender 2.93.x (downloads can be found here) along with some addon(I won’t cover installing them here - there are plenty of resources for that. Use Google! 😉):
- CATS Blender addon - GitHub releases link;
- VRM Addon for Blender - GitHub releases page;
- Material Combiner addon - GitHub releases page.
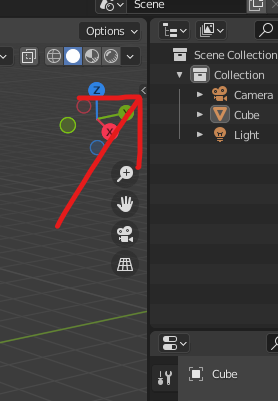
Once you have everything set up, crack open the sidebar by pressing this very hidden arrow button and navigate to the CATS tab:

From there, import your model and get to work at it. I won’t cover optimizing it here - Virtual Panda’s done so in a much better manner(though you don’t need to do it so OTT - VRChat’s packed with unoptimized avatars in anyway!) - but what you need to know is this:

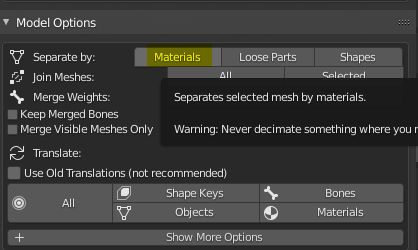
- You’ll want to separate your clothing meshes by materials(see above picture), so save the material atlasing step for last!
- The articles of clothing you intend to keep as a part of only one outfit, you may combine into a single mesh for ever-so-slight optimization;
- DO NOT atlas material textures of outfits(e.g. don’t combine two hoodies together).
Once you have your clothing toggles out as separate meshes and you have other optimizations you wish done, done - export the avatar; CATS plugin will likely be angry at you for having multiple meshes and more than recommended materials, but disregard it and export in anyway.
Provided you have it done correctly, you may proceed to:
Step 3: The Unity Toggling
This is where we’ll get to the actual work on the clothing toggles.
You’ll need some plugins for VRChat’s provided Unity version(but if you have worked with VRoid to VRChat avatar porting before, you should have them already - this guide won’t cover that):
- VRM Converter for VRChat - GitHub Link - after including it into VRChat’s package manager it should add everything else you’ll need.
After that, crack open a new project and import your .fbx file that was given out by Blender. Also, if you did any texture atlasing(or not), you may want to import those textures as well as the original VRM for any materials left untouched.
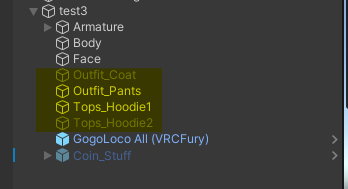
Once you have your materials sorted, if you put the model into the scene hierarchy, you should see that it has multiple meshes in it’s object root directory:

If you have that, then congratulations! From here on out, you’ll want to set up animations that toggle those objects’ states to either Enabled/Disabled, rig it up to your avatar’s FX layer as well as adding toggles in your VRC menu. I will not cover those steps as I feel like I’d be retreading the well-beaten path again for no reason.
If you did it all successfully thus far, you should have a useable clothing toggle for your VRoid avatar, ported over to VRChat! Give yourself a pat on the back - you’ve earned it!